firemail
标题: Mapping Network Disk to Disk Source Code [打印本页]
作者: Qter 时间: 2023-10-29 23:36
标题: Mapping Network Disk to Disk Source Code
https://github.com/nicolonsky/IntuneDriveMapping
作者: Qter 时间: 2023-10-29 23:37
https://www.linksys.com/support-article?articleNum=136363
How to map a network drive on a computer
[color=var(--color-black) !important]Network drive mapping is configuring a file folder on a computer to share files or folders of data over a Local Area Network (LAN). This is configured on computers that want to access a USB storage device or Network Attached Storage (NAS) connected to a router.
[color=var(--color-black) !important]This article will guide you on how to map a network drive or a network storage device.
[color=var(--color-black) !important]IMPORTANT: Before you start mapping your network drive, you need to:
- [color=var(--color-black) !important]Ensure that you have already identified your router's IP Address before mapping (the IP Address of the USB Storage and that of the router are the same). The default IP Address of Linksys routers is 192.168.1.1.
If you are connecting to a Network Attached Storage (NAS), you need to know its IP Address. By default, the IP Address of a Linksys Network Attached Storage is set to 192.168.1.77.[color=var(--color-black) !important]If you are using a wireless computer, ensure that you are connected to the main wireless network. You will not be able to access your USB storage when you are connected to the Guest network. For instructions on how to connect to the wireless network, click [color=var(--color-black)][size=0.875]here.
[color=var(--color-black) !important]Select your computer’s operating system below for specific instructions:
[color=var(--color-black) !important]
[color=var(--color-black) !important][size=0.875]Windows®
[color=var(--color-black) !important]
[size=0.875]Mac OS X®
Windows
[color=var(--color-black) !important]NOTE: These steps are applicable to Windows XP, Windows Vista®, Windows 7 and Windows 8. In this example, we used Windows 7.
[color=var(--color-black) !important]Step 1:
Right-click the Computer icon and click on the Map network drive… option.
[color=var(--color-black) !important]

[color=var(--color-black) !important]Step 2:
Enter the IP Address of the Network Attached Storage or the router with USB storage device and click the Browse… button.
[color=var(--color-black) !important]QUICK TIP: You can specify your desired drive letter in the Drive: drop-down section.
[color=var(--color-black) !important]

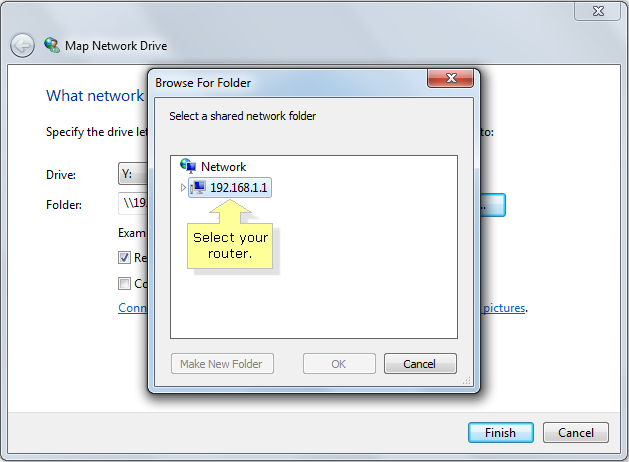
[color=var(--color-black) !important]Step 3:
Double-click on the IP Address of your router.
[color=var(--color-black) !important]
[color=var(--color-black) !important]
QUICK TIP: If you have set up specific shares to users, you will be asked to log in using your Username and Password. Enter their credentials here and click OK. To know more about configuring user access for your USB storage device on a Linksys router, click [color=var(--color-black) !important][size=0.875]here.
[color=var(--color-black) !important]

[color=var(--color-black) !important]Step 4:
Select the name of your USB Storage device and click OK.
[color=var(--color-black) !important]QUICK TIP: If the USB Storage device or Network Attached Storage is partitioned, you will see different folders under the IP Address you selected.
[color=var(--color-black) !important]

[color=var(--color-black) !important]Step 5:
Check the Reconnect at logon box and click Finish.
[color=var(--color-black) !important]NOTE: Tick this box if you want to have the mapped network drive always available in the Computer window. If you leave this unchecked, the drive will be automatically unmapped once you turn off the computer.
[color=var(--color-black) !important]

[color=var(--color-black) !important]A network drive will be displayed in your Computer window and you should now be able to access your USB storage files by clicking on the Network Location icon.
[color=var(--color-black) !important]QUICK TIP: Repeat the same steps in Mapping network drive to add more folders from your USB Storage device or Network Attached Storage.
[color=var(--color-black) !important]

[color=var(--color-black) !important]Mac OS X®
[color=var(--color-black) !important]Step 1:
Click Go then select the Connect to Server... option.
[color=var(--color-black) !important]

[color=var(--color-black) !important]Step 2:
Under Server Address, enter “smb://router’s IP Address or NAS IP Address” and click Connect.
[color=var(--color-black) !important]

[color=var(--color-black) !important]
QUICK TIP: If you have set up specific shares to users, you will be asked to log in using your Name and Password. Enter their credentials here and click Connect. To know more about configuring user access for your USB storage device on a Linksys router, click [color=var(--color-black) !important][size=0.875]here.
[color=var(--color-black) !important]

[color=var(--color-black) !important]NOTE: Check the Remember this password in my keychain if you want to have the mapped network drive always available in your computer. If you leave this unchecked, the drive will be automatically unmapped once you turn off the computer.
[color=var(--color-black) !important]Step 3:
Select the name of your USB Storage device and click OK.
[color=var(--color-black) !important]QUICK TIP: If the USB Storage device or Network Attached Storage is partitioned, you will see different folders under the IP Address you selected.
[color=var(--color-black) !important]

[color=var(--color-black) !important]Once your network drive is mapped on your Desktop, you will be able to access your shared files whenever you are connected to the network as if your computer is physically connected to the USB storage.
[color=var(--color-black) !important]

[color=var(--color-black) !important]QUICK TIP: If you cannot see the icon for your USB storage on your Desktop, click Finder. Select Preferences… and make sure that the Connected servers is selected.
[color=var(--color-black) !important]

[color=var(--color-black) !important]Expanding your network
[color=var(--color-black) !important]Your router has the capability to connect multiple devices in the network such as smartphones, game consoles and printers. If you have a large house with devices that require top wireless speeds and a wide range, you can also extend the range of your wireless network by using other networking devices from Linksys like the Powerline adapters.
| 欢迎光临 firemail (http://www.firemail.wang:8088/) |
Powered by Discuz! X3 |